Android is the most widely used operating system in the world, powering devices from budget smartphones to premium foldables. For developers, this means enormous reach. For testers, however, it means complexity. Every device, screen resolution, and operating system version introduces a new variable. A feature that works seamlessly on one device might fail on another.
This is why Android app testing cannot be treated as an afterthought. A structured process ensures your application runs smoothly across the fragmented Android ecosystem. Below, we break down the key steps in Android app testing, showing how to create reliable and high-performing mobile experiences.
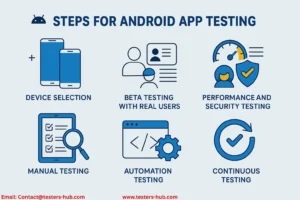
Step 1: Define a Device Testing Strategy
With thousands of Android models available, testing on all of them is impossible. Instead, QA teams build a device matrix to maximize coverage while staying efficient.
Consider:
- Target audience devices – Use analytics or market data to see which phones dominate usage in your region.
- OS versions – Support at least the last three major Android versions.
- Screen sizes – Validate layouts on compact screens, tablets, and foldables.
- Hardware tiers – Test both entry-level and high-end devices to capture performance gaps.
Emulators are helpful for early validation, but nothing replaces testing on real devices, where true hardware and network behavior can be observed.
Step 2: Run Beta Programs for Real-World Feedback
Once internal checks are complete, beta testing brings real users into the picture. Unlike controlled test labs, beta programs highlight how the app behaves in unpredictable, real-world conditions.
Key insights include:
- Network variation – Performance on poor connections versus fast 5G.
- Battery efficiency – Identifying apps that drain power quickly.
- User experience – Observing whether navigation feels intuitive.
- Crash reporting – Capturing logs from diverse devices and settings.
Beta testers often notice usability issues developers overlook. Their input strengthens the app before full release.
👉 Want structured beta testing?
Step 3: Perform Manual Testing
Even in today’s automation-driven world, manual testing is irreplaceable. It helps validate the human experience of using an app.
Manual QA covers:
- Functional testing – Ensuring features like logins, payments, and notifications work correctly.
- UI and UX testing – Checking that screens adapt gracefully to different resolutions.
- Usability testing – Confirming that workflows are simple and frustration-free.
- Exploratory testing – Simulating unexpected user actions to uncover hidden defects.
A well-tested app doesn’t just function—it feels smooth, logical, and enjoyable to use.
👉 Want real testers with real devices?
Step 4: Add Automation for Speed and Coverage
Manual testing alone can’t keep up with the pace of modern app development. This is where automation steps in, saving time and catching regressions faster.
Automation is particularly valuable for:
- Regression testing – Verifying old features after updates.
- Performance checks – Stress-testing apps under high user loads.
- Continuous integration pipelines – Running scripts automatically with every new build.
Popular Android automation tools include Appium, Espresso, and UI Automator. However, automation should be combined with manual insights for the best results.
Step 5: Validate Performance and Security
No matter how feature-rich your app is, users will abandon it if it is slow, drains battery, or feels unsafe. Performance and security testing help prevent these risks.
- Performance testing measures speed, responsiveness, and resource usage.
- Battery and memory checks ensure efficient use of system resources.
- Security validation protects sensitive data with encryption, safe API handling, and proper permission checks.
For apps in finance, healthcare, or e-commerce, these steps are especially critical.
Step 6: Establish Continuous Testing
Android evolves quickly—new devices and OS updates arrive every few months. Without continuous testing, apps risk becoming unstable after every update.
Continuous QA practices include:
- Smoke tests for basic checks after every build.
- Automated regression suites for quick validation.
- Agile integration to keep QA aligned with development sprints.
This proactive approach ensures long-term reliability, fewer production bugs, and higher user retention.
👉 Looking for dedicated QA coverage?
Conclusion
Testing an Android app is not just about finding bugs—it’s about building trust with your users. By carefully selecting devices, leveraging beta programs, balancing manual and automated testing, and validating both performance and security, you can release an app that works seamlessly across the fragmented Android landscape.
Structured QA reduces the risk of negative reviews, increases retention, and helps your app stand out in an overcrowded market.
🚀 Ready to deliver a flawless Android app?
Frequently Asked Questions (FAQ)
Q1. What makes Android app testing more difficult than iOS testing?
Unlike iOS, which runs only on Apple devices, Android apps must work across thousands of phones and tablets from different brands. Each device may have unique hardware, custom software, or an older operating system, making testing more complex.
Q2. How many devices are enough for Android testing?
You don’t need to test on every device. Instead, choose 6–10 models that represent different OS versions, screen sizes, and performance levels. This ensures wide coverage without overspending.
Q3. Should I rely on manual testing or automation?
Neither approach alone is enough. Manual testing is best for usability, exploratory, and design validation, while automation speeds up regression and performance checks. A balanced mix delivers the most reliable results.
Q4. Which automation tools work best for Android apps?
Some of the most widely used tools are Appium (cross-platform support), Espresso (Google’s native Android tool), and UI Automator. The choice depends on your team’s skills and project needs.
Q5. Do apps need to be tested after every update?
Yes. Even small changes or OS upgrades can create new bugs. Running continuous tests after each update helps maintain stability and prevents negative user feedback.